










 Limited to 100 registrants

A 30-minute outage across eight checkout lanes loses 240 lane-minutes of selling capacity, far past the 7-minute abandonment threshold found by a 2024 FreedomPay study. To troubleshoot POS system problems, record the error, scope the outage, protect transactions, and check connectivity.
Do not restart every device at once. First establish whether the fault affects one terminal, one Philippine branch, or every branch. That distinction helps separate a faulty cable or peripheral from a branch network interruption, central service outage, or integration problem.
For recurring failures across locations, document each incident and request a consultation on an integrated point-of-sale system and multi-branch ERP. These steps help, but do not guarantee zero problems; read the full guide that covers 12 scenarios from hardware to suspicious access.
Key Takeaways
Record the error and outage scope first, then protect pending transactions before restarting any terminal or network equipment.
Capture the error and confirm the pending transaction before restarting, then validate transactions and ERP sync after recovery.
Trace each mismatch to its source sale and reconcile the sync queue before adjusting inventory, accounting, or settlement records.
Prevent recurring POS failures by building approved runbooks, assigning escalation owners, and reconciling records rather than relying on one technician.
What Should You Check First to Troubleshoot POS System Failures?
The practical rule is to record the error before restarting anything. Follow this first-response sequence while customers are waiting:
- Photograph or write down the exact message, error code, and time.
- Check whether the fault affects one terminal, the whole branch, or multiple branches.
- Protect any pending order or payment reference before retrying or restarting.
- Inspect power indicators, cables, device status, and authorised network connections.
- Ask whether an approved update, configuration change, or equipment move occurred recently.
- Record any manual transactions so they can be entered and reconciled later.
Your POS troubleshooting checklist should also identify the outage start time, affected checkout lanes, normal transactions per hour, average transaction value, and number of manual transactions captured. These are operating inputs, not universal estimates.
Calculate interrupted lane-minutes as follows:
Affected checkout lanes × unavailable minutes = interrupted lane-minutes
For example, a 225-lane-minute disruption of selling capacity when troubleshooting a POS system failure across five checkout lanes that remain offline for 45 minutes. Management can apply the business's own transactions per lane and average transaction value to estimate internal sales exposure. The result becomes a planning estimate, not confirmed lost revenue.
| Scenario | Immediate safe check | Likely owner | Escalate when |
|---|---|---|---|
| 1. Power or boot failure | Check indicators, outlet, approved adapter, and cable | Branch supervisor or IT | The terminal remains off or smells hot |
| 2. Terminal hardware fault | Compare touchscreen and device response with another terminal | IT or hardware vendor | The fault follows the device |
| 3. Receipt printer failure | Check paper, cover, jam indicators, and connection | Branch supervisor | The printer remains offline after an approved test |
| 4. Barcode scanner failure | Clean the lens and test a known readable barcode | Branch supervisor or IT | The scanner is not detected |
| 5. Cash drawer failure | Check the drawer cable and run an authorised test sale | Supervisor or hardware vendor | The drawer is jammed or physically damaged |
| 6. Frozen software | Wait, capture the error, and protect the active transaction | IT or POS vendor | Crashes repeat or affect several users |
| 7. LAN or Wi-Fi loss | Compare another authorised terminal or service | IT or internet provider | Several branch devices lose access |
| 8. Declined payment | Read the response and confirm transaction status | Customer, issuer, or payment provider | The response is unclear or repeated across cards |
| 9. Gateway timeout | Preserve the reference and check provider status | Payment provider, IT, or POS vendor | Authorisation status cannot be confirmed |
| 10. Inventory mismatch | Match the source sale to the stock movement | Operations or inventory team | Entries are missing, duplicated, or mis-mapped |
| 11. Branch sync failure | Review the queue and last successful sync | IT or POS vendor | The queue remains stuck after connectivity returns |
| 12. Suspicious access | Stop unauthorised use and preserve logs | Security, IT, or management | Credentials, permissions, or transaction data may be exposed |
How Do You Troubleshoot POS System Hardware and Peripherals?
To troubleshoot POS system hardware safely, isolate the affected terminal, cable, port, or peripheral. Avoid restarting the entire branch setup for a problem confined to one device. Branch staff should never open powered equipment, bypass electrical protection, or perform repairs reserved for an authorised technician.
1. Check a POS terminal that will not power on or boot
Confirm that the outlet is approved for use, the power adapter is seated correctly, and indicator lights are visible. Inspect accessible cables for loose connections, bent plugs, or obvious damage. If company procedures allow it, test the outlet or approved cable with known working equipment.
For a terminal that powers on but does not boot normally, record the screen message and stop repeated power cycling. A hot casing, electrical smell, swollen component, damaged adapter, or recurring shutdown is an immediate escalation trigger.
2. Isolate a terminal hardware or touchscreen fault
If one POS terminal fails, comparing it against active terminals is a reliable first step before escalating to IT. Verify that the touchscreen, customer display, card terminal, and attached peripherals appear in the device-status screen. Clean the touchscreen only with the manufacturer-recommended material.
Record the terminal ID, model, accessible serial number, indicator-light status, last successful transaction, and result of any known-working cable or port test. Device-specific manuals and internal safety rules take precedence over general guidance.
3. Restore a receipt printer
When troubleshooting POS system printer faults, start with the simplest physical checks. Make sure that the paper roll is loaded in the correct direction, the cover is fully closed, and no paper is trapped around the cutter. Then confirm the USB, network, or approved wireless connection and inspect the printer's error lights.
A restaurant counter may also need to identify whether the failure affects the cashier receipt printer, kitchen printer, or both. Do not repeatedly resend a large order without checking the print queue, as this can produce duplicate tickets when the connection recovers.
4. Test a barcode scanner
To troubleshoot common POS issues with barcode scanning, wipe the scanner lens with approved material, confirm that its cable is secure, and scan a known readable barcode. Then compare the result with another item. If only one product fails, review the barcode and item master rather than assuming that the scanner is defective.
In a mall retail checkout or distribution outlet, a scanner that beeps but enters no data may be connected physically but not recognised by the POS application. Send support the device ID, model, test barcode result, and last successful use.
5. Check a cash drawer that will not open
Confirm that the drawer cable is connected to the correct printer or terminal port. Run an approved test transaction or authorised drawer test, and check whether the receipt printer completed its part of the command.
Never force the drawer or insert tools into its mechanism. A jammed lock, damaged cable, repeated failure, or mismatch between the drawer opening and the recorded transaction should be reported to the supervisor, IT team, or hardware vendor.
| Symptom | Safe cashier check | Supervisor check | Likely owner | Escalation trigger |
|---|---|---|---|---|
| No power | Check visible plugs and indicators | Test approved outlet or adapter | IT or hardware vendor | Heat, smell, or no response |
| Touchscreen unresponsive | Clean and capture the screen | Compare another terminal | IT or vendor | Repeated freeze or physical damage |
| Printer offline | Check paper, cover, and lights | Check queue and approved connection | IT or printer vendor | Jam or persistent offline state |
| Scanner not reading | Clean lens and test another item | Check device recognition and item data | IT, inventory team, or vendor | Multiple valid barcodes fail |
| Drawer closed | Complete the authorised test | Check cable and transaction record | Supervisor or vendor | Mechanical damage or inconsistent opening |
For longer-term device planning, look for the best POS system that can handle large operations. Start with those that offer a free trial, such as HashMicro's integrated POS system. The system is built for enterprise retail with capabilities such as offline-first selling, role-based permissions, cashier session control, and real-time ERP integration.

How Do You Fix Slow, Frozen, or Unresponsive POS Software?
Before troubleshooting POS system performance issues, check whether a sale, payment request, or synchronisation process is still active. Repeatedly tapping Pay, Submit, or Confirm may create duplicate requests or records. Capture the error first, then close only the affected application if permitted by your support procedure.
1. Recover frozen POS software without duplicating transactions
Use this sequence to troubleshoot POS system software:
- Record the error code, software version, affected user, terminal ID, and time.
- Check whether one application, the whole terminal, or several users are affected.
- Confirm the status of the pending transaction before submitting it again.
- Review available device resources through approved tools.
- Restart only the affected application or terminal according to IT instructions.
- Sign in with an authorised account and check unsent or pending transactions.
- Apply only approved updates or configuration changes.
2. Validate Transactions and ERP Integration After Recovery
To troubleshoot common POS issues thoroughly, perform a quick validation before returning to normal selling. Review pending orders, duplicate receipts, unsent transactions, stock movements, sales journals, and branch dashboards against the branch's daily sales report to confirm every recovered transaction is captured.
3. Escalate Recurring POS Software Failures
Escalate repeated crashes, multiple affected users, database errors, or failures that began after an approved release. Provide application logs, timestamps, recent change details, and the last successful synchronisation time.
This evidence helps technical teams troubleshoot POS system errors without repeating completed checks or risking further transaction inconsistencies.
How Do You Resolve POS Network and Internet Connectivity Issues?

Compare another terminal and another authorised service first. If one device fails while the rest of the branch works, investigate the device or its connection. If several devices fail, check the local network. If multiple branches cannot reach the same service, central IT or the software provider may need to investigate.
Troubleshoot POS System Network Interruptions
Local network access and internet access are not the same. A Philippine branch might still reach a network printer or local device while being unable to connect to a cloud application. Conversely, public websites might load while a required private service, VPN, or integration endpoint remains unavailable.
| Outage pattern | What to compare | Possible fault area | Contact |
|---|---|---|---|
| One terminal fails | Another port, approved cable, or terminal | Device, cable, or local configuration | Branch IT |
| Several devices fail | Wired and wireless services | Switch, access point, or branch network | Network team |
| Whole branch loses internet | Provider status and approved router indicators | ISP circuit or branch router | IT or internet provider |
| Multiple branches lose one service | Other cloud services and central status | Application, integration, or central infrastructure | Central IT or POS vendor |
| Local services work but cloud POS fails | Internet, VPN, and provider status | WAN, VPN, firewall policy, or cloud service | IT or vendor |
When troubleshooting POS system connectivity, check network indicators, cables, and approved Wi-Fi, then test from an authorised second device. Record the branch, terminal IDs, connection type, and offline transactions. Cashiers should not change network settings; follow the approved restart order.
To troubleshoot common POS issues during an outage, label offline receipts, apply payment restrictions, and count records awaiting sync. Once connectivity returns, reconnect once, monitor the queue, and verify successful uploads before retrying manually. For multi-location setups, see our guide to multi-branch inventory management.
How Should You Handle Payment Errors and Declined Transactions?
To handle payment errors safely, verify the transaction status before retrying, protect sensitive payment data, and preserve only authorised, non-sensitive details. When troubleshooting POS system payments, never collect full card numbers, PINs, CVVs, passwords, or authentication codes. A declined response or timeout does not prove the POS or payment has failed, though consistent payment problems are worth weighing when comparing retail POS systems.
1. Respond to a declined POS transaction
A decline is not automatically a POS software fault. Read the exact response without guessing whether the cause is available funds, issuer controls, card status, or another condition. Confirm that the terminal has connectivity, then follow the payment provider’s instructions.
This wording “The payment was not approved on this attempt. We can try another approved payment method, or you may contact your provider for more information.” is a suitable example of customer-facing tone. It keeps the conversation neutral and avoids blaming the customer or bank.
Record the timestamp, branch, terminal ID, amount, payment method, response code, and masked reference. If different cards receive the same technical error across several terminals, investigate connectivity, the gateway, or the acquiring service. This comparison helps teams troubleshoot common POS issues without misclassifying issuer declines as system faults.
2. Resolve a payment gateway timeout
To troubleshoot POS system gateway timeouts, preserve the transaction reference and check the terminal or provider status before retrying. A timeout means the terminal did not receive a clear result within the expected transaction flow; it does not prove that the payment failed.
Responsibility should be divided clearly:
- Branch staff capture the message, protect the pending sale, and avoid blind retries.
- Internal IT checks the terminal, approved network path, and affected locations.
- The payment provider or acquiring bank confirms authorisation and settlement status.
- Finance compares tender totals, provider settlements, refunds, voids, and duplicates.
- The POS vendor investigates application behaviour or integration defects.
When the service returns, check for duplicate charges, duplicate POS records, missing receipts, and end-of-day settlement differences. Compare POS tender totals with the payment provider's transaction and settlement records before posting corrections through accounting and sales integration.
How Do You Correct Inventory Mismatches and POS Data Sync Issues?
By restoring connectivity, review the sync queue, match each source transaction, and adjust records only after identifying missing or duplicate entries. A technically restored terminal can still leave the item master, stock ledger, sales journal, accounting entries, and branch dashboard incomplete, so confirm every record ties back to the underlying point of sales data before you close the reconciliation.
1. Trace an inventory mismatch to its source sale
When troubleshooting POS system inventory discrepancies, start with the transaction reference, branch ID, item code, quantity, timestamp, and payment status. Check whether the sale exists in the POS, whether the corresponding stock movement was recorded in the ERP, and whether an adjustment or duplicate document was created later.
Do not post a blanket stock adjustment simply because the displayed balance looks wrong. First investigate delayed sales, returns, voids, duplicate entries, unit-of-measure mapping, branch transfers, and manual offline records. Operations should confirm the physical facts, while finance and IT trace the related system documents.
2. Reconcile a branch synchronisation failure
Review the last successful sync time and count the records currently queued. Once the connection is stable, synchronise according to the approved process and monitor the queue once. Repeatedly triggering the same upload can complicate duplicate detection.
Use a worksheet such as the following:
Free worksheet template example:
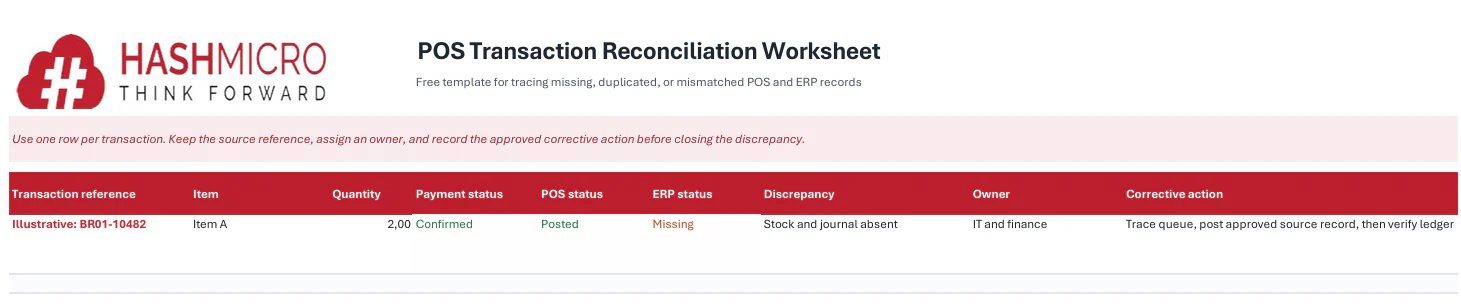
The example is illustrative, not a reported client result. Each correction should retain the original reference, corrective document, responsible person, timestamp, and approval. Validate inventory management software and accounting software integration records before closing the incident.
For offline POS transactions, use this reconciliation sequence:
- Stabilise connectivity and preserve a copy of the offline queue status.
- Confirm the expected number of offline sales and their references.
- Run the authorised synchronisation process once.
- Check for rejected, duplicated, or partially posted records.
- Match each payment record to the corresponding POS transaction.
- Validate quantities against inventory movements and item codes.
- Confirm sales journals, taxes, receivables, and settlement entries.
- Approve targeted corrections only after tracing the original record.
How Do You Respond to Suspicious POS Access or Security Alerts?
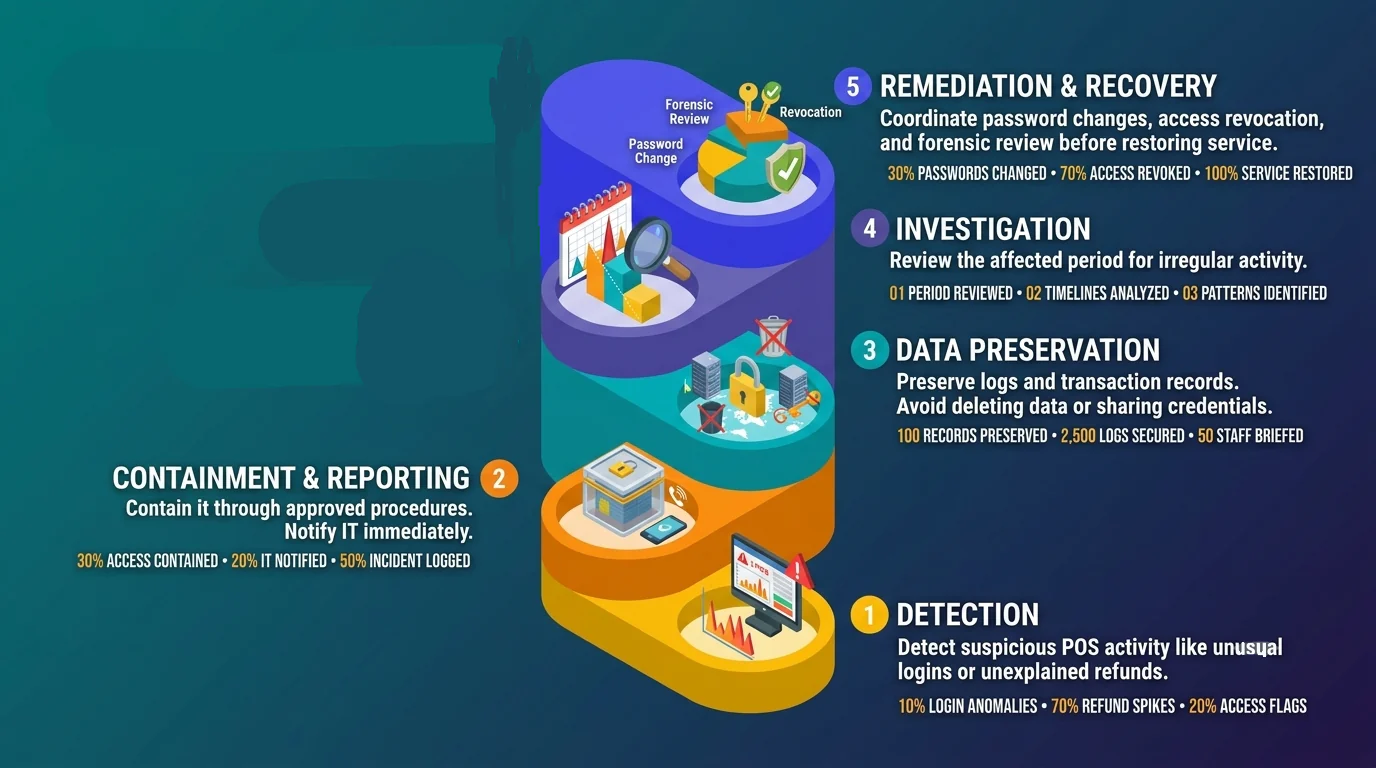
To troubleshoot POS system security alerts, treat unusual logins, unexpected permission changes, unknown remote-access sessions, unexplained refunds, altered prices that do not match your approved dynamic pricing regulation, or transactions under the wrong user as potential incidents. Stop unauthorised activity through the organisation’s approved procedure while protecting the records required to determine what occurred.
When troubleshooting POS system access, remove the affected terminal from service only if authorised, notify IT or the security owner, and preserve messages, user and terminal IDs, timestamps, transaction references, access logs, and recent approved changes. Do not delete logs, install unapproved tools, or share credentials in support tickets.
After containment, review the affected period for unusual sales, voids, refunds, discounts, cash-drawer activity, item changes, and data exports. This helps teams troubleshoot common POS issues without overlooking possible misuse. Authorised personnel should coordinate password changes, session termination, access revocation, device isolation, forensic review, and approval before service resumes.
What Information Should You Send When Escalating a POS System Failure?
A POS escalation packet should help the assigned support owner reproduce, trace, and assess the incident without repeating branch-level checks. When troubleshooting POS system failures, separate observed facts from assumptions, document completed actions, and preserve only authorised evidence.
Send the following information:
- Branch name and terminal or device ID
- Device model and accessible serial number
- Incident start time and last successful transaction
- Exact error message and code
- Affected functions, users, terminals, and branches
- Masked transaction references
- POS software version and last successful synchronisation
- Network status and connection type
- Recent authorised changes
- Troubleshooting already attempted and its result
Arrange the evidence chronologically and send it to the owner identified in the scenario table. Never include passwords, full payment credentials, PINs, CVVs, or authentication codes. Preserve screenshots, logs, and references only according to company and payment-provider procedures.
For fast-paced food and beverage counters, choosing a reliable restaurant POS system makes these escalation packets faster to assemble.
How Can You Prevent Recurring POS System Problems?
A reliable way to troubleshoot POS system problems is to build a branch routine rather than leave that knowledge with one technician. Create an approved runbook for each device type, assign escalation owners, keep terminal and peripheral inventories current, and review recurring incident patterns.
| Preventive Control | Purpose | Recommended Owner | Review Frequency |
|---|---|---|---|
| Scheduled device inspections | Detect hardware wear before failure | Branch supervisor or IT | Monthly |
| Approved software updates | Address security and stability issues | IT team | Per release schedule |
| Role-based access reviews | Prevent unauthorised use and data exposure | IT or security owner | Quarterly |
| Network monitoring | Identify connectivity issues before they affect selling | IT team | Ongoing |
| Tested offline procedures | Maintain branch continuity during outages | Branch manager | Semi-annually |
| Clear payment escalation rules | Reduce delays when payments fail or time out | Operations and finance | Per policy cycle |
| Routine reconciliation of sales, inventory, payments, and accounting records | Confirm downstream ERP data remains accurate | Finance and IT | Daily or per shift |
Any update or configuration change should document the owner, implementation time, affected branches, validation result, and rollback procedure before going live.
When the same failures repeat across branches, the root cause is often a system design or integration gap rather than an isolated device. Documenting incident patterns, assigning clear ownership, and reviewing runbooks regularly are the foundation of preventing recurring POS system problems.
Using a good POS system can prevent these problems. Request a free consultation for HashMicro POS to define integration scope, staff training requirements, and post-go-live support for your business.
Conclusion
POS failures appear as frozen screens, payment declines, network dropouts, and inventory sync gaps. To see the true cost of each failure, multiply the affected checkout lanes by unavailable minutes to calculate interrupted lane-minutes.
By knowing that, you can focus on the most critical issue and troubleshoot the POS system by working through a symptom-cause-fix sequence and assigning clear ownership to hardware, software, network, and payment layers.
A well-integrated POS system reduces these incidents by keeping hardware, software, and transaction data in sync across every branch. Regular device checks, software updates, network monitoring, and staff training on offline procedures turn reactive troubleshooting into a structured response. Build that strong foundation with HashMicro POS and review how it can connect to your ERP operations.

FAQ for Troubleshooting POS System
Do not restart it immediately unless an authorised incident procedure requires this. Capture the exact message, timestamp, amount, and masked transaction reference, then check the terminal or payment-provider status. Confirm whether the payment was approved, declined, or remains pending before retrying so you do not create a duplicate charge or POS record.
Review the offline queue and expected transaction count before synchronising through the approved process once. Check for rejected or duplicate records, match each payment to its POS transaction, and validate the resulting inventory movements and accounting entries. Do not post blanket stock adjustments before tracing the original transactions.
Branch staff should preserve receipts and transaction references, while finance compares POS tender totals with provider settlement records, refunds, voids, and duplicate attempts. Internal IT investigates connectivity, the payment provider confirms authorisation and settlement status, and the POS vendor examines application or integration defects.
Send the branch and terminal IDs, timestamps, exact error, affected functions, masked transaction references, software version, network status, recent authorised changes, and troubleshooting already attempted. Include logs or screenshots only when authorised, and never send passwords, PINs, CVVs, authentication codes, or unmasked payment credentials.
Compare another terminal, another authorised service, and a second branch before changing configurations. One failed device suggests a terminal, cable, port, or local configuration issue. Several failed devices at one branch suggest its network or internet connection, while the same service failing across branches points to central infrastructure, a shared integration, or the software provider.